Are you tired of getting stranded on the side of the road with a flat tire? Well, worry no more! In this step-by-step tire repair guide, we will show you how to use Fix a Flat to quickly and easily fix your flat tire. With this handy product, you can get back on the road in no time, without the hassle of changing a tire or waiting for roadside assistance.
First, we will help you assess the damage and identify the cause of the flat tire. Then, we will guide you through preparing the tire by removing debris and preparing the surface.
Next, we will provide you with step-by-step application instructions for using Fix a Flat. Once your tire is fixed, we will show you how to properly inflate it to restore proper air pressure.
Finally, we will discuss precautions and limitations for driving with a temporary fix, as well as when it’s time to consult a tire expert. Don’t let a flat tire ruin your day – let us show you how to use Fix a Flat and get back on the road quickly and safely!
Key Takeaways
– Fix a Flat is a quick and easy way to temporarily fix a flat tire without changing it or waiting for roadside assistance.
– The process of using Fix a Flat involves assessing the damage, identifying the cause of the flat tire, and preparing the tire surface.
– The steps for using Fix a Flat include shaking the can, attaching the nozzle to the valve stem, releasing the sealant, driving the vehicle to spread the sealant, and inflating the tire to the recommended pressure.
– It is important to remember that a temporary fix with Fix a Flat is not as stable as a properly repaired or replaced tire and should only be used as a last resort. Professional help should be sought for a long-term solution.
Assessing the Damage: Identifying the Cause of the Flat Tire
Now that you’ve got a flat tire, let’s dive in and figure out what caused it, so you can get back on the road in no time!
The first step is to assess the damage and identify the cause of the flat tire. Start by visually inspecting the tire for any obvious signs of damage, such as nails, screws, or sharp objects embedded in the tread. If you don’t see anything, try feeling around the tire carefully to see if you can locate a puncture.
Another way to identify the cause is by listening for a hissing sound, which indicates air escaping from the tire. Additionally, you can use a spray bottle filled with soapy water to look for bubbles, as they signify a leak.
Once you’ve identified the cause, you’ll be one step closer to fixing your flat tire and hitting the road again.
Preparing the Tire: Removing Debris and Preparing the Surface
Before diving into the repair process, it’s important to clear away any debris and properly prepare the surface of your tire. Start by removing any objects stuck in the tire, such as nails or screws, using pliers or a similar tool. Be careful not to puncture the tire further while doing this.
Next, inspect the tire for any sharp objects that may have caused the flat, such as glass or sharp rocks. Use a pair of gloves to protect your hands while doing this.
Once the debris is removed, clean the area around the puncture with a rag or brush to ensure a smooth surface for the patch to adhere to. Make sure to remove any dirt or grease from the tire.
Now, you’re ready to move on to the next step of the repair process.
Using Fix a Flat: Step-by-Step Application Instructions
Get ready to roll with the simple and effective application instructions for Fix a Flat! Applying Fix a Flat is a breeze and can save you time and money.
Start by shaking the can vigorously for about 30 seconds to ensure the tire sealant is well-mixed.
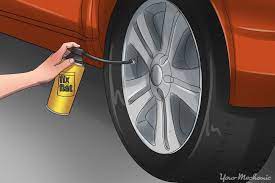
Then, remove the cap from the tire valve stem and attach the nozzle tightly. Press the nozzle down to release the tire sealant into the tire, making sure to hold the can upright.
Once the can is empty, remove the nozzle and quickly replace the valve stem cap.
Next, drive the vehicle immediately for about 2-4 miles to allow the tire sealant to spread evenly inside the tire.
It’s that simple! Fix a Flat provides a quick and temporary solution to get you back on the road in no time.
Inflating the Tire: Restoring Proper Air Pressure
Make sure you don’t miss a beat as you effortlessly restore proper air pressure to your tire, getting you one step closer to a smooth and worry-free ride.
After applying Fix a Flat and removing the nozzle, it’s time to inflate the tire.
First, locate the valve stem and remove the cap. Attach the air compressor nozzle securely to the valve stem, ensuring a tight fit.
Turn on the compressor and let it fill the tire with air. Keep an eye on the pressure gauge and stop when you reach the recommended PSI for your tire.
Once the tire is properly inflated, remove the compressor nozzle and quickly replace the valve stem cap.
Double-check the pressure with a tire gauge to ensure accuracy.
With the proper air pressure restored, you can confidently hit the road again.
Driving with a Temporary Fix: Precautions and Limitations
As you embark on your journey with a temporary fix, it’s important to be aware of the precautions and limitations that come with it. While a temporary fix can get you back on the road quickly, it is not a permanent solution and should only be used as a last resort.
It’s crucial to remember that a tire repaired with a temporary fix is not as stable as a properly repaired or replaced tire. You should avoid high speeds and sudden maneuvers, as these can put additional stress on the tire and increase the risk of a blowout.
It’s also recommended to limit your driving distance with a temporary fix. As soon as possible, you should visit a professional tire repair shop to have the tire properly repaired or replaced to ensure your safety on the road.
Seeking Professional Help: When to Consult a Tire Expert
When it comes to ensuring your safety on the road, it’s essential to know when it’s time to consult a tire expert.
While temporary fixes like using a tire sealant or a can of fix-a-flat can be convenient in some situations, they are not long-term solutions.
If you have used a temporary fix on your tire, it’s crucial to seek professional help as soon as possible. A tire expert will be able to assess the damage and determine whether the tire can be repaired or if it needs to be replaced.
They have the knowledge and experience to properly inspect the tire and ensure that it is safe for you to continue driving. Don’t risk your safety by relying solely on a temporary fix – consult a tire expert to get the professional help you need.
Frequently Asked Questions
What are the common causes of flat tires?
Common causes of flat tires include punctures from nails, screws, or sharp objects on the road, damage to the tire from hitting potholes or curbs, and leaks from worn-out or damaged valve stems.
How long does it take for Fix a Flat to seal a puncture?
Fix a Flat usually takes around 10 minutes to seal a puncture. Simply attach the nozzle to the tire valve, press the button, and wait for the foam to fill the tire.
Can Fix a Flat be used on all types of tires, including tubeless and run-flat tires?
Fix a Flat can be used on all types of tires, including tubeless and run-flat tires. It’s a versatile solution that can seal punctures and get you back on the road quickly and easily.
Is it safe to drive at high speeds with a tire repaired using Fix a Flat?
Yes, it is safe to drive at high speeds with a tire repaired using Fix a Flat. The product is specifically designed to provide a temporary fix and allow you to drive to a professional for a proper repair or replacement.
Can Fix a Flat be used as a permanent solution for a flat tire, or is it only temporary?
Fix a Flat is a temporary solution for a flat tire. It’s not recommended as a permanent fix because it may not fully seal the puncture and can cause tire imbalance or damage.
Conclusion
So there you have it, a step-by-step guide on how to use Fix a Flat to repair your flat tire.
By assessing the damage, preparing the tire, using the product correctly, and inflating the tire to the proper air pressure, you can get back on the road in no time.
However, it’s important to remember that a temporary fix has its limitations, so it’s always best to seek professional help when necessary.
Stay safe and happy driving!