Have you ever found yourself in a situation where you needed to capture a screen shot on your iPhone, but weren’t quite sure how to do it quickly and efficiently?
Well, fear not, because in this discussion, we will explore some quick capture techniques that will make taking screen shots on your iPhone a breeze.
Whether you want to capture a funny text conversation, save an important image, or document a bug on your device, these techniques will have you covered.
So, let’s dive in and discover the secrets to effortless screen shot capturing on your iPhone.
Using the Side Button
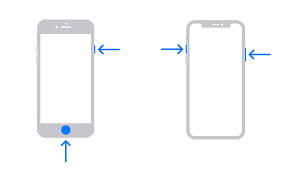
To quickly access certain functions on your iPhone, you can conveniently use the side button. This button, located on the right side of your device, has multiple functions that make navigating your iPhone easier and more efficient.
One of the most useful features of the side button is its ability to take screenshots. By pressing the side button and the volume up button simultaneously, you can capture whatever is on your screen with just a quick gesture. This is especially handy when you want to save a funny meme, capture a conversation, or document important information.
Once you’ve taken a screenshot, you can easily access it by tapping on the thumbnail that appears in the bottom left corner of your screen. From there, you can edit, share, or delete the screenshot as needed.
Utilizing Assistive Touch
Have you ever wondered how to make navigating your iPhone even easier? Well, look no further because utilizing Assistive Touch is the answer! With Assistive Touch, you can perform a wide range of actions on your iPhone with just a few taps. This feature is especially useful for those who may have difficulty with the physical buttons on their device.
To enable Assistive Touch, simply go to your iPhone’s Settings, tap on Accessibility, and then select Touch. From there, you can toggle on the Assistive Touch option. Once enabled, a small floating button will appear on your screen, allowing you to access a variety of shortcuts and functions.
One of the most common uses of Assistive Touch is taking screenshots. Instead of having to press multiple buttons simultaneously, you can simply tap on the Assistive Touch button, select Device, and then choose the option to take a screenshot. It’s quick, easy, and convenient!
Assistive Touch also offers customizable gestures, allowing you to create shortcuts for frequently used actions. For example, you can set up a gesture to quickly access the control center or adjust the volume. This feature truly enhances the accessibility and convenience of your iPhone.
Taking a Screenshot With Siri
Taking a screenshot with Siri is a simple and convenient way to capture what’s on your iPhone screen. Siri, the virtual assistant on your iPhone, can assist you in taking a screenshot without the need to use any physical buttons.
To begin, activate Siri by holding down the Home button or saying ‘Hey Siri’ if you have that feature enabled. Once Siri is activated, simply say, ‘Take a screenshot.’ Siri will then execute the command, and a screenshot of your current screen will be captured. You’ll hear the familiar camera shutter sound, indicating that the screenshot has been successfully taken.
The screenshot will be saved in your Photos app, where you can find it in the ‘Screenshots’ album. From there, you can edit, share, or delete the screenshot as desired. With Siri’s help, you can effortlessly capture important moments or share information from your iPhone screen with others.
Taking a screenshot with Siri is a convenient feature that saves you time and effort.
Capturing a Full Page
If you want to capture an entire webpage on your iPhone, there’s a simple technique you can use. Instead of taking multiple screenshots and trying to stitch them together manually, you can use the built-in screenshot feature to capture the entire page in one go. Here’s how you can do it.
First, open the webpage that you want to capture. Make sure that you’re viewing the entire page and not just a portion of it. Once you’re ready, press and hold the power button on the right side of your iPhone. At the same time, press the home button located at the bottom of the screen. You’ll hear a sound similar to a camera shutter, indicating that the screenshot has been successfully captured.
After taking the screenshot, a small preview will appear at the bottom left corner of your screen. Tap on it to open the screenshot in the Markup editor. At the top right corner of the screen, you’ll see an option that says ‘Full Page’. Tap on it to switch from the default ‘Screen’ option to ‘Full Page’. This will show you the entire webpage that you captured.
You can now scroll through the captured webpage and even make annotations using the Markup tools if desired. When you’re finished, you can save the screenshot to your Photos app or share it with others directly from the Markup editor.
Capturing a full page on your iPhone is a quick and convenient way to save or share important information from websites. It eliminates the need for multiple screenshots and ensures that you capture the entire content in one image. Give it a try the next time you come across a webpage you want to save!
Sharing and Editing Screenshots
To edit and share your screenshots on iPhone, follow these simple steps.
After capturing a screenshot, a thumbnail will appear in the bottom left corner of your screen. Tap on the thumbnail to open the screenshot in the editor. From here, you can crop, rotate, or add text and drawings to your screenshot.
To crop, tap on the Crop button at the bottom of the screen and drag the edges to select the desired area. Once you’re satisfied with your edits, tap Done.
To share your screenshot, tap on the Share button at the bottom left corner of the screen. A menu will appear with various sharing options, such as AirDrop, Messages, Mail, or social media platforms like Facebook or Instagram. Simply select the desired option and follow the prompts to complete the sharing process.
Alternatively, you can also save your edited screenshot to the Photos app by tapping on the Save to Photos button. This will allow you to access and share the screenshot at a later time.
Editing and sharing screenshots on your iPhone is quick and easy, allowing you to capture and share important moments or information with just a few simple steps.
Troubleshooting Common Screenshot Issues
Having trouble capturing screenshots on your iPhone?
Don’t worry, we’ve got you covered.
In this section, we’ll address some common issues you may encounter, such as:
- Error messages during capture
- Blurry or distorted screenshots
- Screenshots not saving properly
Let’s troubleshoot these problems together and get your screenshot game back on track.
Error Messages During Capture
When encountering error messages during capture on your iPhone, it’s important to troubleshoot common screenshot issues for a smooth experience.
One common error message that you may come across is ‘Cannot Take Screenshot’. This usually happens when you try to capture a screenshot of protected content, such as movies or certain apps. To resolve this issue, ensure that you aren’t trying to capture copyrighted material.
Another error message you may encounter is ‘Storage Full’. This means that your iPhone’s storage is almost full and there isn’t enough space to save the screenshot. To fix this, try deleting unnecessary files or apps to free up storage space.
Additionally, if you see the message ‘Screenshot Not Saved’, it could be because your iPhone’s storage is completely full. In this case, you’ll need to delete some files before attempting to capture a screenshot again.
Blurry or Distorted Screenshots
If you’re experiencing blurry or distorted screenshots on your iPhone, there are several troubleshooting steps you can take to address this issue.
First, make sure that your iPhone’s screen is clean and free from any smudges or fingerprints. Use a soft, lint-free cloth to gently wipe the screen and remove any dirt or oils.
Additionally, check the clarity of your iPhone’s camera lens. If it’s dirty or scratched, it can affect the quality of your screenshots. Clean the lens with a microfiber cloth or lens cleaner to improve the clarity.
Lastly, ensure that your iPhone’s software is up to date. Sometimes, blurry or distorted screenshots can be caused by software glitches. Update your iPhone’s software to the latest version to fix any potential bugs or issues.
Screenshot Not Saving
To troubleshoot the common issue of screenshots not saving, try the following steps.
First, check if your iPhone has enough storage space. Insufficient storage can prevent screenshots from saving properly.
Next, make sure that you aren’t using any third-party apps or settings that interfere with screenshot saving. Some apps or settings can restrict the saving of screenshots.
Additionally, restart your iPhone as it can help resolve temporary software glitches that may be causing the issue.
If the problem persists, update your iPhone to the latest software version. Updates often include bug fixes that can address screenshot saving problems.
Lastly, if none of these steps work, contact Apple Support for further assistance.
Frequently Asked Questions
Yes, you can! On your iPhone, you can take a screenshot without using any buttons by simply using the AssistiveTouch feature. Just enable it in Settings and you’re good to go!
Yes, it is possible to capture a specific portion of the screen on your iPhone. Just use the built-in screenshot tool by pressing the Side button and Volume Up button simultaneously, then drag to select the desired area.
To take a screenshot on an older iPhone model without a side button, you can press the Home button and the Power button at the same time. This will capture whatever is on your screen.
Conclusion
In conclusion, taking a screenshot on an iPhone is quick and easy with various techniques. Whether it’s using the side button, utilizing Assistive Touch, or even capturing a full page, there are multiple ways to capture what’s on your screen.
Additionally, sharing and editing screenshots is a breeze, and common screenshot issues can be easily troubleshooted.
With these techniques at your disposal, capturing and sharing moments on your iPhone has never been simpler.